
A toner cartridge plays a very crucial role in maintaining the print quality and performance of the Brother printer. After a toner cartridge reaches the end of its life, the printer showcases warning messages including “toner low”, “replace toner,” or “toner cartridge replacement required.” Once you know how to replace toner in Brother printer, you can easily restore print quality and prevent errors and unexpected downtime. In this guide, we will show you how to replace the toner cartridge, install a new one, address common issues and their solutions, and more. Stay tuned to know further.
How To Replace Toner In Brother Printer?
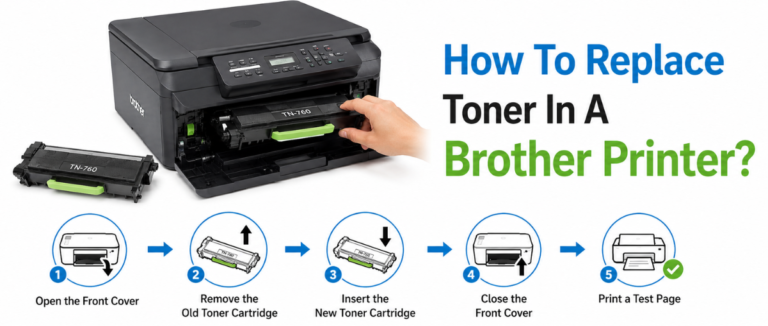
Here are some steps to help you easily replace the toner in a Brother printer. Go through all of them at once:-
1. Ensure the machine is turned on.
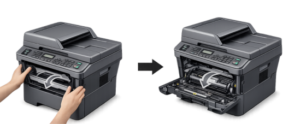
2. Now open the front cover, leave the machine turned on for 10 minutes in order to let the internal fan cool the internal parts that are too hot.
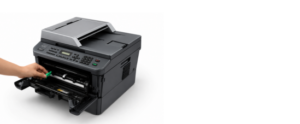
3. Now remove the drum unit and toner cartridge assembly.
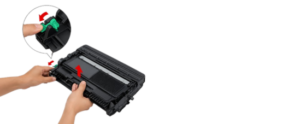
4. Now push down the green lock lever carefully and bring the toner cartridge out of the drum unit.
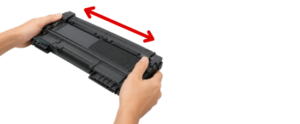
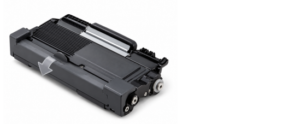
5. Now simply unpack the new toner cartridge. Support the cartridge with both hands and keep it level.
6. Take the protective cover out carefully.
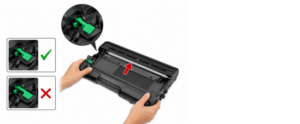
7. Now put the new toner cartridge properly into the drum. Seat the new toner cartridge firmly in the drum unit until it locks into place. Once you place it in properly, the green lock lever will lift automatically.
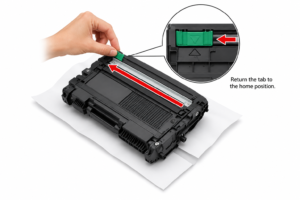
8. Now clean the corona wire within the drum unit by gently sliding the green tab right from left to right and right to left several times.
9. Now install the drum unit and toner cartridge assembly right back into the machine.
When Should You Look For A Replacement Toner Cartridge?
When the toner cartridge’s life ends, the printer status window will display a few messages indicating that the toner cartridge needs to be replaced. Go through all of them at once.
| Message | Upon Display | Errors And Resolutions |
| <The (toner color) * toner cartridge are required to be replaced soon.> | When a toner cartridge is required to be replaced soon
|
|
| <Check the toner cartridges> <(toner color)* toner cartridges with the print quality which cannot be guaranteed or used toner cartridges that have reached their lifetime may be inserted. If you continue to use these cartridges, then it might cause a malfunction, so replacing these cartridges with new cartridges is recommended.> | When a toner cartridge has just reached the end of its life
|
|
Things You Should Know Before Replacing The Toner Cartridge
It is important to consider the points given below before replacing the toner cartridge in a Brother printer.
- It is recommended to use only genuine Brother toner cartridges to avoid compatibility issues or damage later.
- All the new cartridges come with orange plastic protective covers and seals. Make sure to peel these off properly before trying to lock the new toner into the drum.
- Do hold the new cartridge with both hands and gently rock it from side to side 5 to 6 times to ensure the toner is distributed evenly.
- The drum unit contains a primary corona wire, which helps prevent defects. Carefully slide the colored tab (often blue or green) back and forth several times. Make sure to put it back to the home position before reinstalling the drum assembly.
- When replacing the cartridge in the drum unit, press down until you hear it click into place. If you install properly, then the lock lever will lift automatically.
- Right after securing the new toner and closing the front cover, don’t turn off the printer or unlock the cover again until the display returns to “ready mode”.
Ways Of Resetting Toner On A Brother Printer
Here are some efficient methods for resetting toner on a Brother printer. Go through all of them at once.
Method 1: The “back and go” button method (for LCD/Monochrome model)
(Appears on various Brother printers, including HL-L2360DW, MFC-L2710DW, and L3210CW.
- Turn on the printer and open the “Front Cover”.
- Now press the “Back/Return ” and “Cancel ” buttons simultaneously, or press back and go at the exact same time.
- Now release the buttons, then press the “back button ” once again to view the “reset menu “.
- Now use the “arrow keys ” in order to scroll through the toner options(standard, high capacity (TNR -HC), or super high capacity).
- Now click on the “color/yield ” that you want to reset and then press “ok “.
- Now press the ” up or down arrow ” in order to confirm or select “reset.” Once “accepted” appears, just close the front cover.
Method 2: The Hidden Menu Methods (for touchscreen models)
(Quite common on the brother models such as MFC-L3740CDWE or HL-L3290 CDW.
- Turn on the printer and open the front cover.
- Now press the “cancel button ” in order to clear any current errors on the screen.
- Press and hold the “home button ” or look for the “hidden” reset area (generally at the top left corner) for around 5 seconds until the ” reset menu ” appears.
- Simply “tap ” the toner/color that you want to reset and select its capacity.
- Confirm by pressing “yes” or “ok “. Now “close ” the front cover.
Methods 3: The Power and Go Method (no screen)
It’s quite common for the basic printers that have only a few LEDs (like the HL-L2300 series)
- Turn the printer “off “.
- Open the front cover.
- Now press and hold the “go ” button while turning the printer on at the same time.
- Now “release ” the go button right after about 3 seconds, when all the lights turn “on “.
- Press the go button “9 times “. The “Wi-Fi LED ” will flash once.
- Now “pause ” briefly, then press the go button around “5 times “.
- At last, close the cover.
Common Issues Users Face After Replacing Toner
| Problem | Solution |
| The printer keeps on displaying “replace toner,” “toner low,” or “toner ended” even if you have installed a new cartridge.
|
|
| “No toner”. “Toner error,” or Cartridge not detected” texts are appearing on the screen
|
|
| Print is looking streaky, faded, blurry, or has missing areas.
|
|
| The printer is reporting “wrong toner” right after installation
|
|
| The toner cartridge is unable to lock into the drum unit or printer
|
|
| The printer is unable to detect the toner cartridge right after installing the new firmware
|
|
What Are The Benefits Of Replacing A Genuine Brother Toner?
There are various benefits of using genuine Brother toner. Have a look at them one by one:-
- Provides flawless print quality.
- Ensure hardware protection.
- Helps to have maximum page yield.
- Maintains long-term cost efficiency.
- Provides environmentally responsible disposal programs.
Conclusion!
Once you know how to replace toner in Brother printer, you can easily achieve better print quality and reliable performance. Along with this, if the best result is your ultimate goal, consider genuine Brother toner cartridges, as they are specifically designed to deliver page yield, compatibility, and print quality. As a user, ensure you have regular maintenance and toner replacement on time to maintain efficiency.
Related Post: How To Connect Brother Printer to Wi-Fi?
FAQs
A. Yes, it is possible to do so, as most brother printers allow users to continue printing for a limited time when the toner is low. Although it is possible, it is recommended to keep a replacement cartridge ready.
A. Some Brother printer models need a toner reset right after installing a new cartridge. The reset methods totally depend on the printer model and control panel type.
A. The replacement frequency depends entirely on your printing volume and cartridge yield. The printer will automatically notify you when the toner levels become very low or empty.