
If you are looking to Connect brother printer to wifi, you can easily print from various devices, including tablets, computers, and smartphones, without relying on cables. Whether you are using a mobile app, a computer, or another connection method, the process is quite simple and easy to follow. If you want to know more, you can get help from this guide. It demonstrates various ways to connect the Brother printer to Wi-Fi via a computer, a mobile device, WPS, and direct wireless methods. These methods are applicable to both Android and iOS devices. Stay tuned to know further.
How To Connect Brother Printer To Wi-Fi Using A Computer?
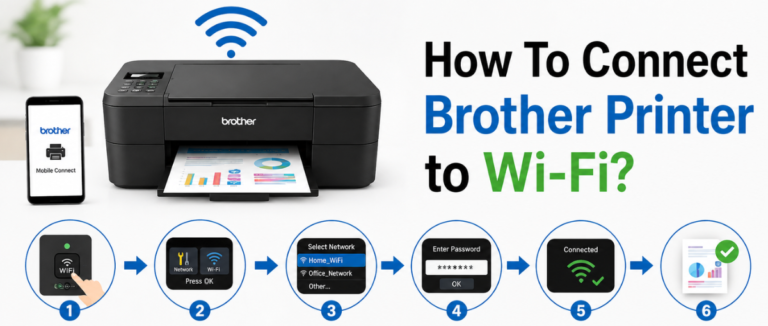
To connect brother printer to wifi, you must have a Wi-Fi network name (SSID), a Wi-Fi password (network key), a powered Brother printer, and a computer properly connected to the same wireless network.
- First, “Download and Install” the Brother software.
- Now open the “Downloaded File “and begin the setup utility on your computer.
- Now select the “Wireless network connection”.
- Now the installer will look for the available wireless networks and guide you through the setup process.
- Choose your wireless network from the list of available networks.
- Now enter your “Wi-Fi Password” and continue.
- The setup utility will send the wireless settings to the printer and try to connect it to the network.
- Now wait till the connection gets “Confirmed”.
- Now select the “Brother Printer” from the list of detected devices and complete the driver installation.
- Now print a test page in order to verify that the printer is properly connected to the Wi-Fi network and properly communicating with your computer.
How To Connect The Brother Printer To A Wireless Router Using A Mobile App?
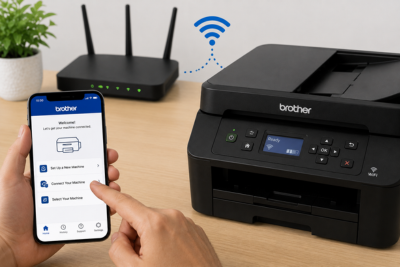
Before proceeding to connect the Brother printer via a wireless router, you must connect both your mobile device and brother printer to the same wireless network. It maintains a seamless connection between the two. Follow the instructions given below to do the same.
- Open the Brother “Mobile Connect Application” on your mobile device.
- Tap “Printer Setup” and select setup via “Wireless Router”.
- After the request, enter your “Network SSID and Password”.
- Adhere to the on-screen instructions in order to complete the connection.
| Note – It is applicable for both iOS and Android users |
How To Connect A Brother Printer To A Mobile Device Without A Router?
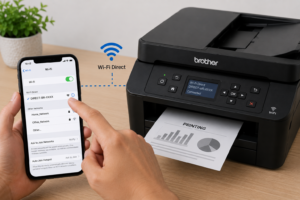
Here are some steps to help a user easily connect a Brother printer to a mobile device without a router.
- “Power on” your Brother printer and go through the network settings menu.
- Now choose the wireless direct and then tap on “on” to start the feature.
- Once you enable the feature, the printer will broadcast its own wireless network that you can easily find among the listed networks on your mobile devices.
How To Check The Connection And Ensure Printer- App Compatibility Via Mobile
Here are some steps to help a user check the connection and determine whether the printer app is compatible.
1. First, check whether the printer shows a connected status.
- Ensure the “Wi-Fi” signal is strong.
- Now open the Brother “Mobile Connect App”.
- Ensure the printer appears in the app.
- Print a test page to verify everything is working correctly.
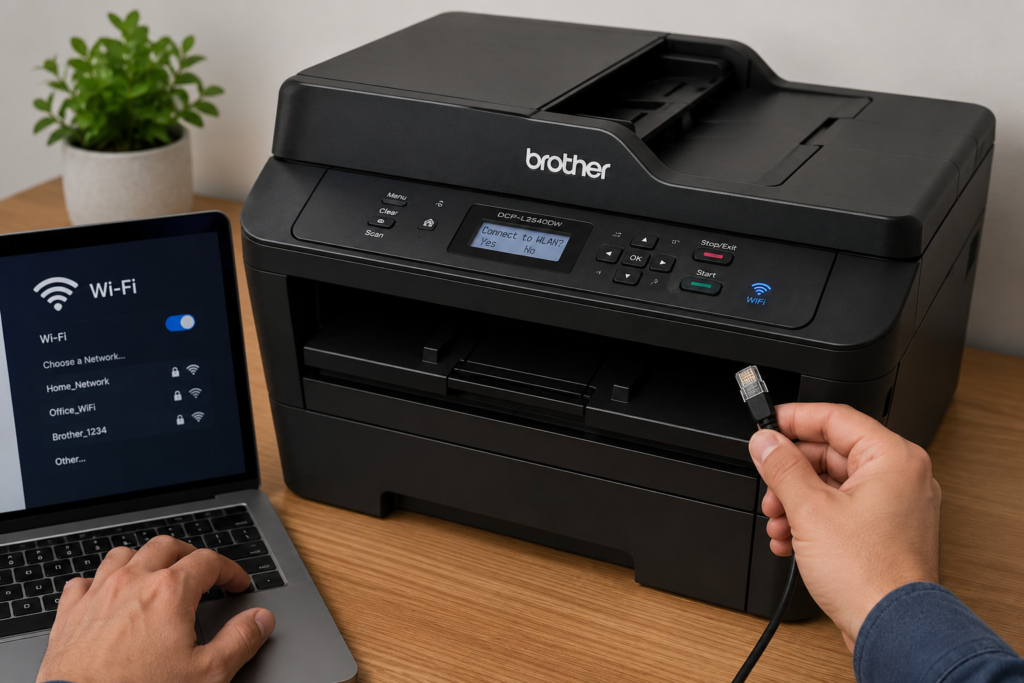
Procedure For Setting Up A Wireless Network Using A USB Cable
If you want to set up a wireless network with the help of a USB cable, you can follow the steps given below:
- You must have the “SSID and Password” of your “WLAN” access router in advance.
- Now “Download and Install” the printer driver and P-touch Editor.
- During the installation of the printer driver, all the required items for establishing a wireless network connection will pop up on the screen.
How To Establish A Wireless Network Connection Via WPS
To do this, you are required to follow the steps below for successful results.
- First, make sure your WLAN (Wireless Local Area Network) access point/router has a WPS symbol. If yes, keep the printer within the range of the WLAN access point router. The range will vary as per your environment.
- Start your printer; Press and Hold the “Wi-Fi Button” till it starts blinking “Blue Light”.
- Press the WPS button on the wireless access point/router.
- After the connection is established, the Wi-Fi indicator will start blinking in “Blue”.
- Now add the printer to the computer.
How To Establish A Wireless Network Connection Via Infrastructure Mode
To initiate this, the user must follow the steps below. Go through all of them at once.
- First, confirm the “SSID and Password” of your WLAN access point beforehand.
- Now, establish a connection between the printer and the computer with the help of a USB cable.
- Now press and hold the power button in order to turn on the printer till the Wi-Fi indicator starts blinking.
- Now start the printer “Setting Tool” on your computer and then click the “Communication Settings Button”.
- Now select “Infrastructure” in the communication mode field.
- Now enter the “SSID”, click Search, and select the SSID from the displayed list.
- Mention the “Password” in the passphrase field.
- Now, to send the settings to the printer, click on “Apply”.
- If the connection gets established, the Wi-Fi indicator will “Turn on”.
- Now add the printer to the computer.
How To Establish A Wireless Network Connection Via Ad-Hoc Mode
Here are some of the steps mentioned below that you can take help of to establish a wireless network connection using the Ad-Hoc mode:-
- First, “Turn on” the printer.
- Now press and hold the “Wi-Fi button” on your printer for at least one second in order to turn on the Wi-Fi function.
- Now initiate the printer “Setting Tool” on your computer and click on the “Communication Settings Button”.
- Select “Ad-Hoc” in the communication mode field.
- Now mention the SSID that you have noted, click “Search”, and select the SSID from the displayed list.
- Now enter the “Password” in the passphrase field.
- In order to send the settings to the printer, click on “Apply”.
- After the connection is established, the Wi-Fi indicator will start “Blinking”.
- Now, you are required to add the printer to the computer.
Conclusion!
To Connect Brother printer to WiFi, you don’t need to follow a rigid process; there are several simple ways that you can look for to initiate it. To do so, you can take the help of a computer, a mobile app, or a direct wireless connection. Once you set it up, it becomes easy to print from your smartphone, computer, or tablet without relying on cables. So look for a method compatible with the device and network you are working with, and follow the right steps for a smooth setup experience.
FAQs!
Q1. Can I connect my Brother printer to Wi-Fi without a cable?
A. Yes, you can easily connect it using WPS, wireless direct, or a mobile app, depending on the printer model you use.
Q2. How to connect Brother printer to Wi-Fi using WPS?
A. To do so, just press the WPS button on your router and press and hold the Wi-Fi button on the printer until it starts blinking. The connection will be completed automatically.
Q3. How do I reset my Brother’s wireless printer to connect to Wi-Fi?
A. Just go to the network settings, reset the network settings on the printer, restart it, and set up Wi-Fi again from the beginning.
Q4. How can I connect the printer to my mobile device via Wi-Fi
A. To do so, make sure both devices are on the same Wi-Fi network, then use the Brother Mobile Connect app or AirPrint (iOS) to add the printer.
Q5. What is the reason behind my brother printer not connecting to Wi-Fi?
A. There are various reasons for this, including the wrong Wi-Fi password, incompatibility with the router, a weak signal, errors in the network settings, and the printer not being in setup mode.